Copyright lawyers spend a lot of time encouraging and reminding their photographer clients to register their copyrights with the U.S. Copyright Office. As I have written previously, although copyright registration is not required to have a valid copyright, it is required to bring an enforcement action in court (at least for U.S. works), and timely registration – that is, either within three months of publication or before a particular infringement occurs – is required to be eligible to receive attorney’s fees and statutory damages.
So, you’ve registered your art or photos. Good job. Now what?
Assuming you did everything right during the registration process, you’ll end up with a registration certificate issued by the Copyright Office, and the public record of your copyright claim will appear in the U.S. Copyright Office’s database, which you can search at www.copyright.gov/records. Because the Copyright Office still issues paper certificates, if you register your work regularly, you’ll end up with a pile of paper (especially if you’re filing paper applications with continuation sheets, which can quickly become voluminous if you register more than a handful of images).
What good are the certificates? Well, if you ever have a situation where someone uses your work without permission, your lawyer will want to look at the certificate and a copy of the work as you registered it to help he or she evaluate the strength of your case. If you reach out to the infringer with a cease and desist letter, attaching the applicable certificate can help motivate compliance, and of course, if you end up having to litigate, you’ll have to attach a copy of the certificate to your complaint when you file the lawsuit.
All of this is to say that you don’t really need the certificates…until you need them. And when you do need them, usually the last thing you have time for is hunting through boxes and files trying to find which certificate goes with which registration.
In my book Copyright Workflow for Photographers: Protecting, Managing, and Sharing Digital Images, I lay out a filing technique that I have found works well. There’s no right or wrong way to do this, of course, but here’s one approach you may want to consider:
- Scan the registration certificate into a PDF and include the registration number and the title of the registered work in the filename. I also include the abbreviation “Cert” in the filename, so I know it’s the certificate. For example, I registered images from a shoot in Barcelona as an unpublished collection titled “Chris Reed Photography (Barcelona 2013).” I was issued registration number VAu001139321. So, the filename of the certificate is VAu001139321-Barcelona2013-Cert.pdf. (To keep the filename a reasonable length, I drop the “Chris Reed Photography.”)
- When I file using the Copyright Office’s electronic system, eCO, I usually submit a PDF contact sheet of all the images included in my registration application. I rename that file following the same structure as in Step 1, except replace “Cert” with “Deposit.” So, for the example above, it would be VAu001139321-Barcelona2013-Deposit.pdf.
If you submit multiple image files, you can follow the same procedure, by appending a number after “Deposit” (e.g., “Deposit01,” Deposit02,” and so on). Alternatively, you could compress the images into an archive file (ZIP or equivalent) and name it similarly. Again, using the example above, it would be VAu001139321-Barcelona2013-Deposit.zip.
- Save the two files (the one from Step 1 and the one from Step 2) together in a directory on your computer. I have a folder called “Copyright Registration Records” on my computer, divided into subfolders by year. This approach lets me find them easily if I know when I registered the images, and putting the registration number and title in the filename lets me use my computer’s search feature to find them if I can’t remember the date.
- That leaves you with a paper registration certificate. Although you just scanned the certificate in Step 1, I strongly encourage you to maintain the original because you may need it down the road for litigation or some other circumstances that requires you to establish ownership. The Copyright Office will issue reprints of certificates for a fee, but you can avoid paying again by maintaining good recordkeeping practices in the first place.
I keep my registration certificates in file folders, sorted by year. Depending on how many you have, you might also consider putting them in three-ring binders, sorted by year.
Although copyright registration certificates are important documents, they’re merely records of a copyright ownership claim, and they don’t represent the claim itself. This is a little different from other important documents you may have come across, like stock certificates or even checks, where the value of the asset it represents goes with the document. So, although you should keep certificates in a safe, easily accessible place (so you don’t have to pay the Copyright Office to issue a replacement), you don’t generally need to worry about keeping them in a safe deposit box or anything like that.
Updating Your Electronic Image Archive
Keeping the certificates and deposit copies in a safe and easily identifiable location is a great start to your copyright registration recordkeeping, but the other half of the equation is to make sure that your electronic database is up-to-date. After all, that’s where most of your work probably takes place.
Here’s my relatively straightforward process using Lightroom:
- Switch to the Library module in Adobe Lightroom and create a collection set called “Copyright Registrations” by clicking the + icon in the Collections panel and selecting Create Collection Set. The Create Collection Set dialog box appears.
- Give your collection set a name. I called mine “Copyright Registrations,” but you can call it whatever you’d like. Make sure the “Inside a collection set” box is unchecked, and click Create.
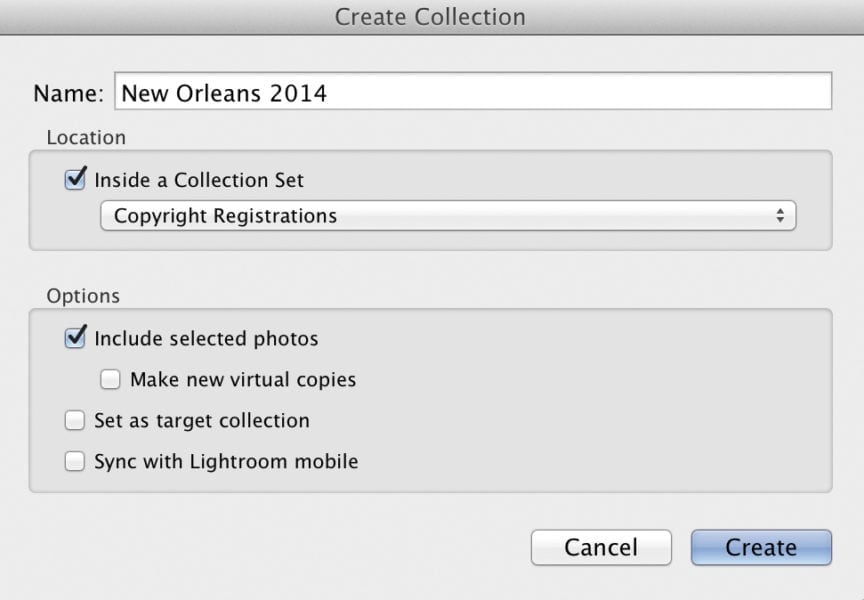
- Click the + icon again in the Collections panel, and select Create Collection. The Create Collection dialog box appears.

- Give your collection a name. I typically use the title that I provided to the Copyright Office as the title of this work on the registration form. If you’ve already selected the images that are part of the collection or group, go ahead and check the “Include selected photos” box. If you haven’t selected the images, leave that box unchecked. You can easily drag them into the collection after you create it. When you’re done, click Create.

- Once you’ve created the collection, switch to Grid mode if you’re not already in it, and select all the images in the collection by pressing Command-A (Mac) or Ctrl-A (PC).
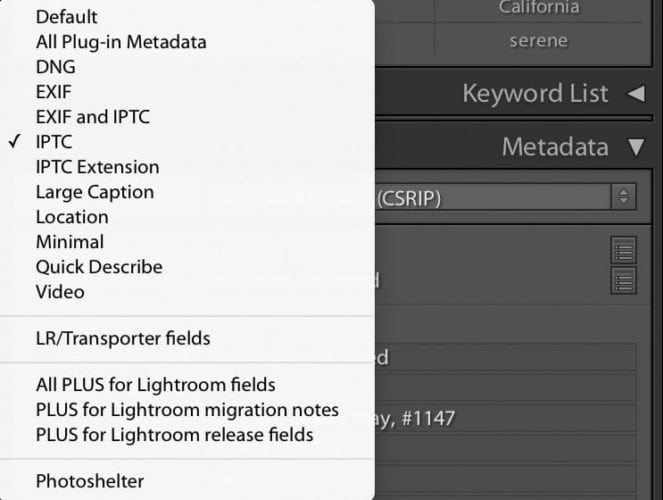
- Find the Metadata panel on the right-hand side and make sure that you have IPTC selected from the drop-down list at the top of the panel.

- Unfortunately, while the IPTC metadata standard includes certain copyright-related fields (like the copyright status of the work and certain identifying information about the copyright owner), it does not include a place to include the copyright registration number.

There are two ways to handle this: one is to select some other IPTC field that you don’t typically use and put the registration information there instead. That’s what I’ve been doing for many years, using the JobID or Job Identifier field in the Workflow section.
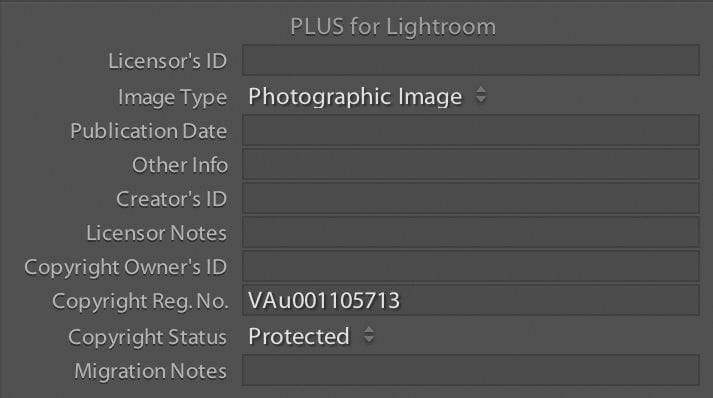
The major drawback of this approach is that it’s inconsistent with the IPTC standard. The whole point of having an international standard like IPTC is that everyone using it speaks the same language, and by using a field for something that it isn’t intended for, you could cause confusion down the road if you distribute images that contain that metadata to some organization (say, a stock photo agency) that does use that field. So, for your own internal purposes, it’s probably fine, but a much cleaner way to incorporate copyright registration information into your images is to use a Lightroom plugin that effectively extends the software’s metadata capabilities. PLUS for Lightroom is a tool from www.photographers-toolbox.com that incorporates dozens of additional metadata fields from the PLUS standard, including copyright registration number. As of this writing, the plugin is about $25 and is available from Photographer’s Toolbox.

- Regardless of which method you choose, the purpose of this step is to record the registration number in the metadata of the images that are registered under that number. Enter the registration number in the field of your choice. Because you have multiple image files selected, Lightroom may warn you that you’re trying to bulk-update the metadata. Click Apply to Selected and Lightroom will make the update to your catalog.

If you’re lucky, you’ll never actually need your copyright registration certificates, but in the event that someone uses your work unlawfully, or you need to demonstrate your ownership of a particular image for some reason, following the simple steps outlined here will make it easier and much less stressful.
For more tips on maintaining your images and maximizing your intellectual property rights, check out my book, Copyright Workflow for Photographers: Protecting, Managing, and Sharing Digital Images.
